
WindowsServerの監視と最小特権の原則
最終更新日: 03 年 2024 月 XNUMX 日The purpose of this configuration is to run remote WMI functionality without administrator privileges. This configuration is done as follows:
Adding User to Groups
After the user is created, you must add the user to the following groups:
- 分散COMユーザー – It provides permission to access and interact with the Distributed Component Object Model (DCOM) objects on a Windows system. It allows you to run applications that rely on DCOM for inter-process communication and access distributed services across a network.
- Performance Monitoring Users – It provides permission to monitor and collect performance data on a Windows system. It allows you to run performance monitoring tools and gather system metrics.
- イベントログリーダー – It provides permission to read event logs on a Windows system. It allows you to monitor and analyse system events. It allows you to view and extract information from event logs, troubleshoot issues, and analyse systems.
- リモート管理ユーザー – It provides permission to remotely manage tasks on a Windows system. It allows you to run commands or scripts remotely and manage configurations. It allows you to utilise services such as, Windows Remote Management (WinRM) and PowerShell remoting.
注: Adding user to the Remote Management Users group is required only for WinRM. Add user to this group only if the user intends to toggle between DCOM and WinRM.
Adding User to Groups in a Domain based Setup
- From an elevated PowerShell console or cmd.exe, type the command
dsato launch Active Directory Users and Computers. Alternatively, open dsa.msc from the Run window (Win+R). - Under your domain, right-click ユーザー をクリックして 新作 > ユーザー。 A New Object – User ダイアログボックスが表示されます。
- Enter a username in the ユーザーのログオン名 フィールドを選択し、 Next

- Set the password and select OK.
- Double-click the newly created entry of this user. The <username> Properties ダイアログボックスが表示されます。
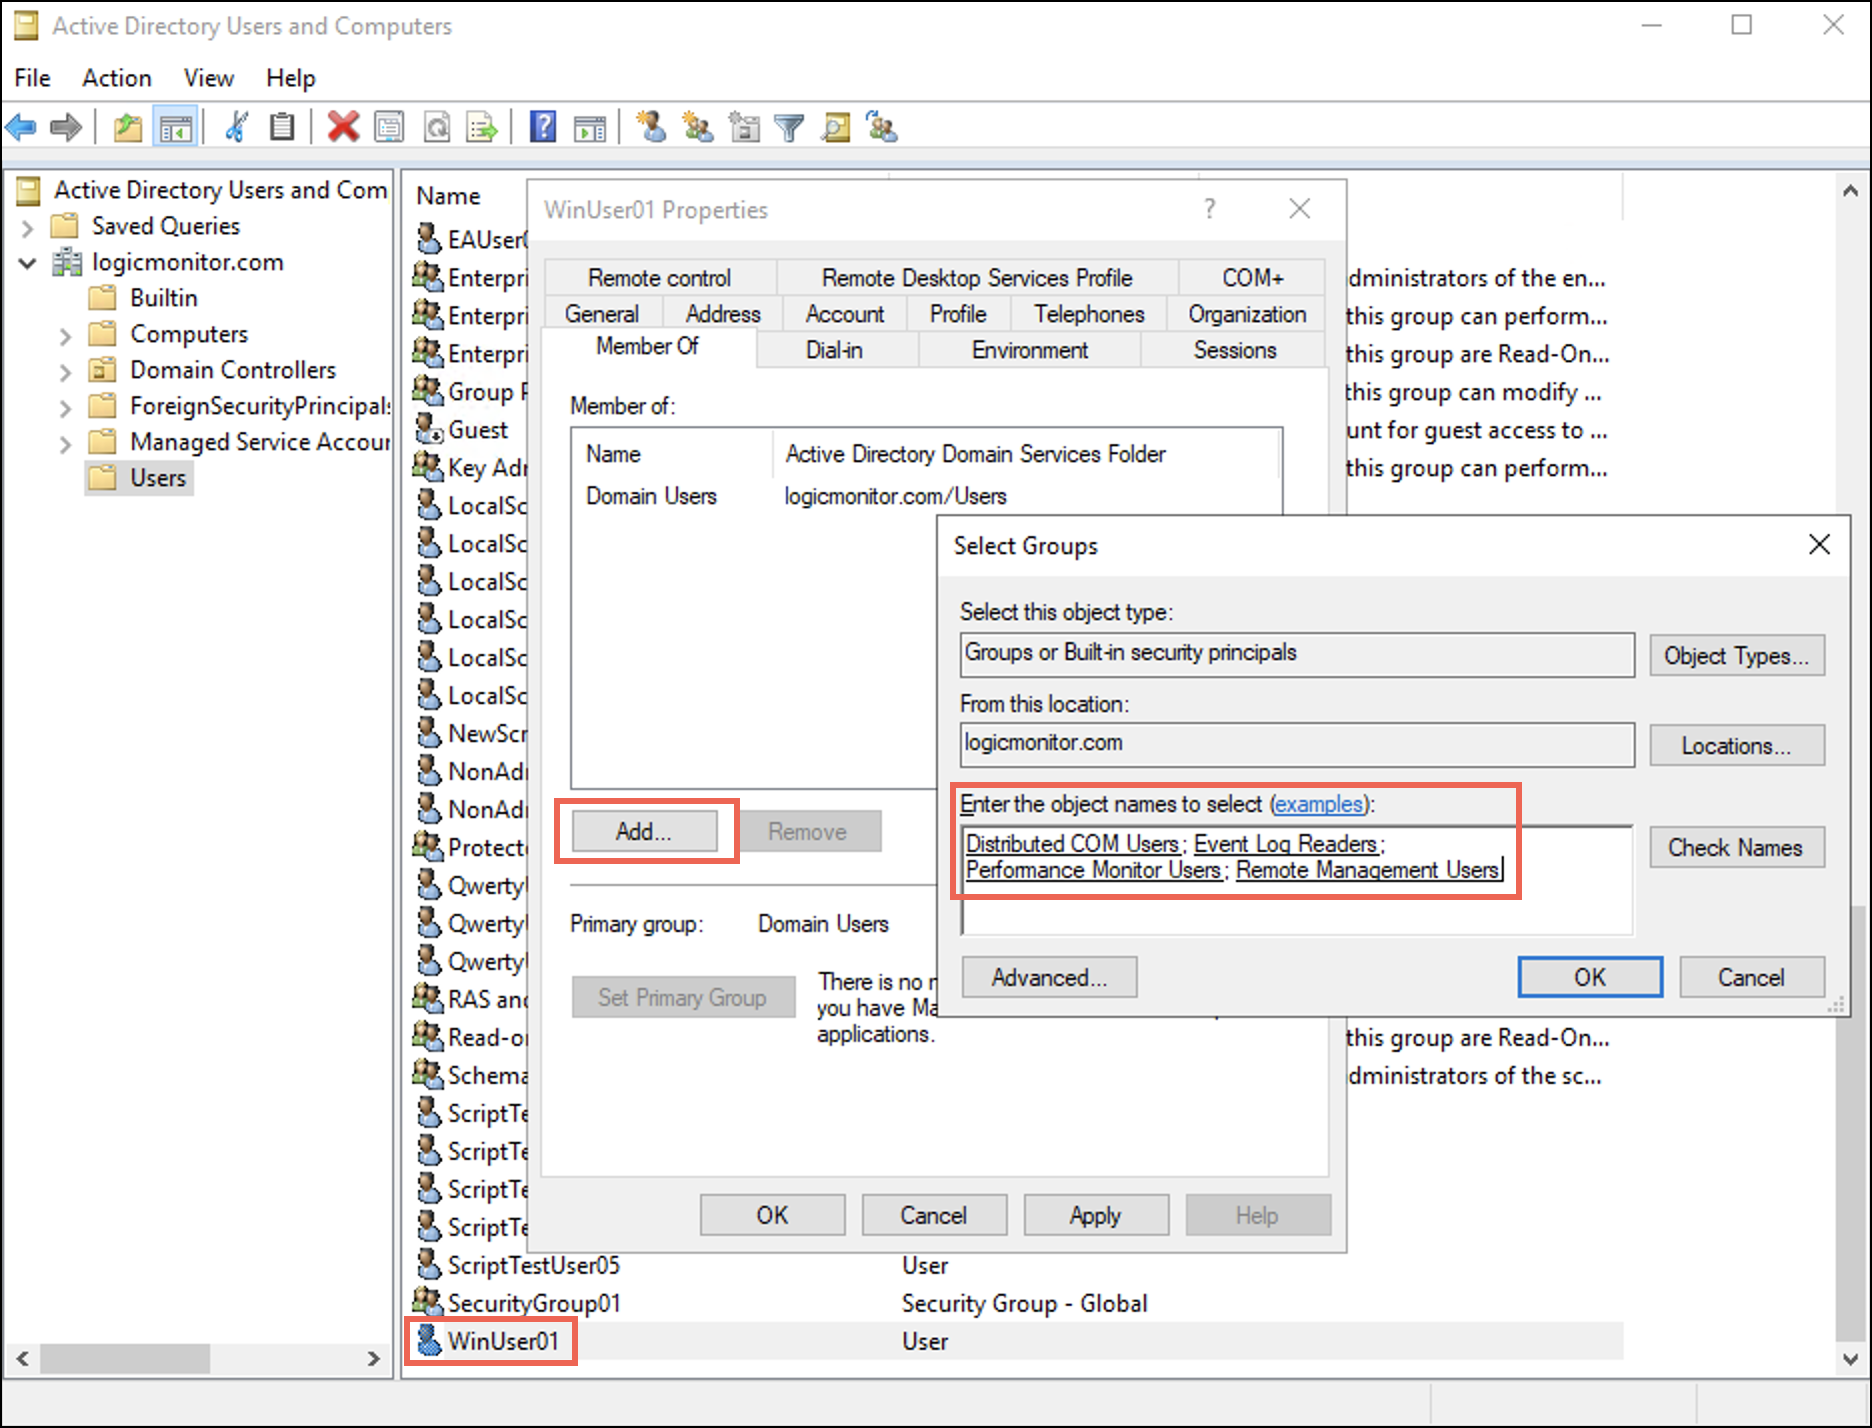
- 現在地に最も近い 所属 タブを選択して Add ボタン。 ザ グループを選択 ダイアログボックスが表示されます。
- Enter the names of the four groups in the Enter the object names to select (examples): フィールドを選択し、 OK.

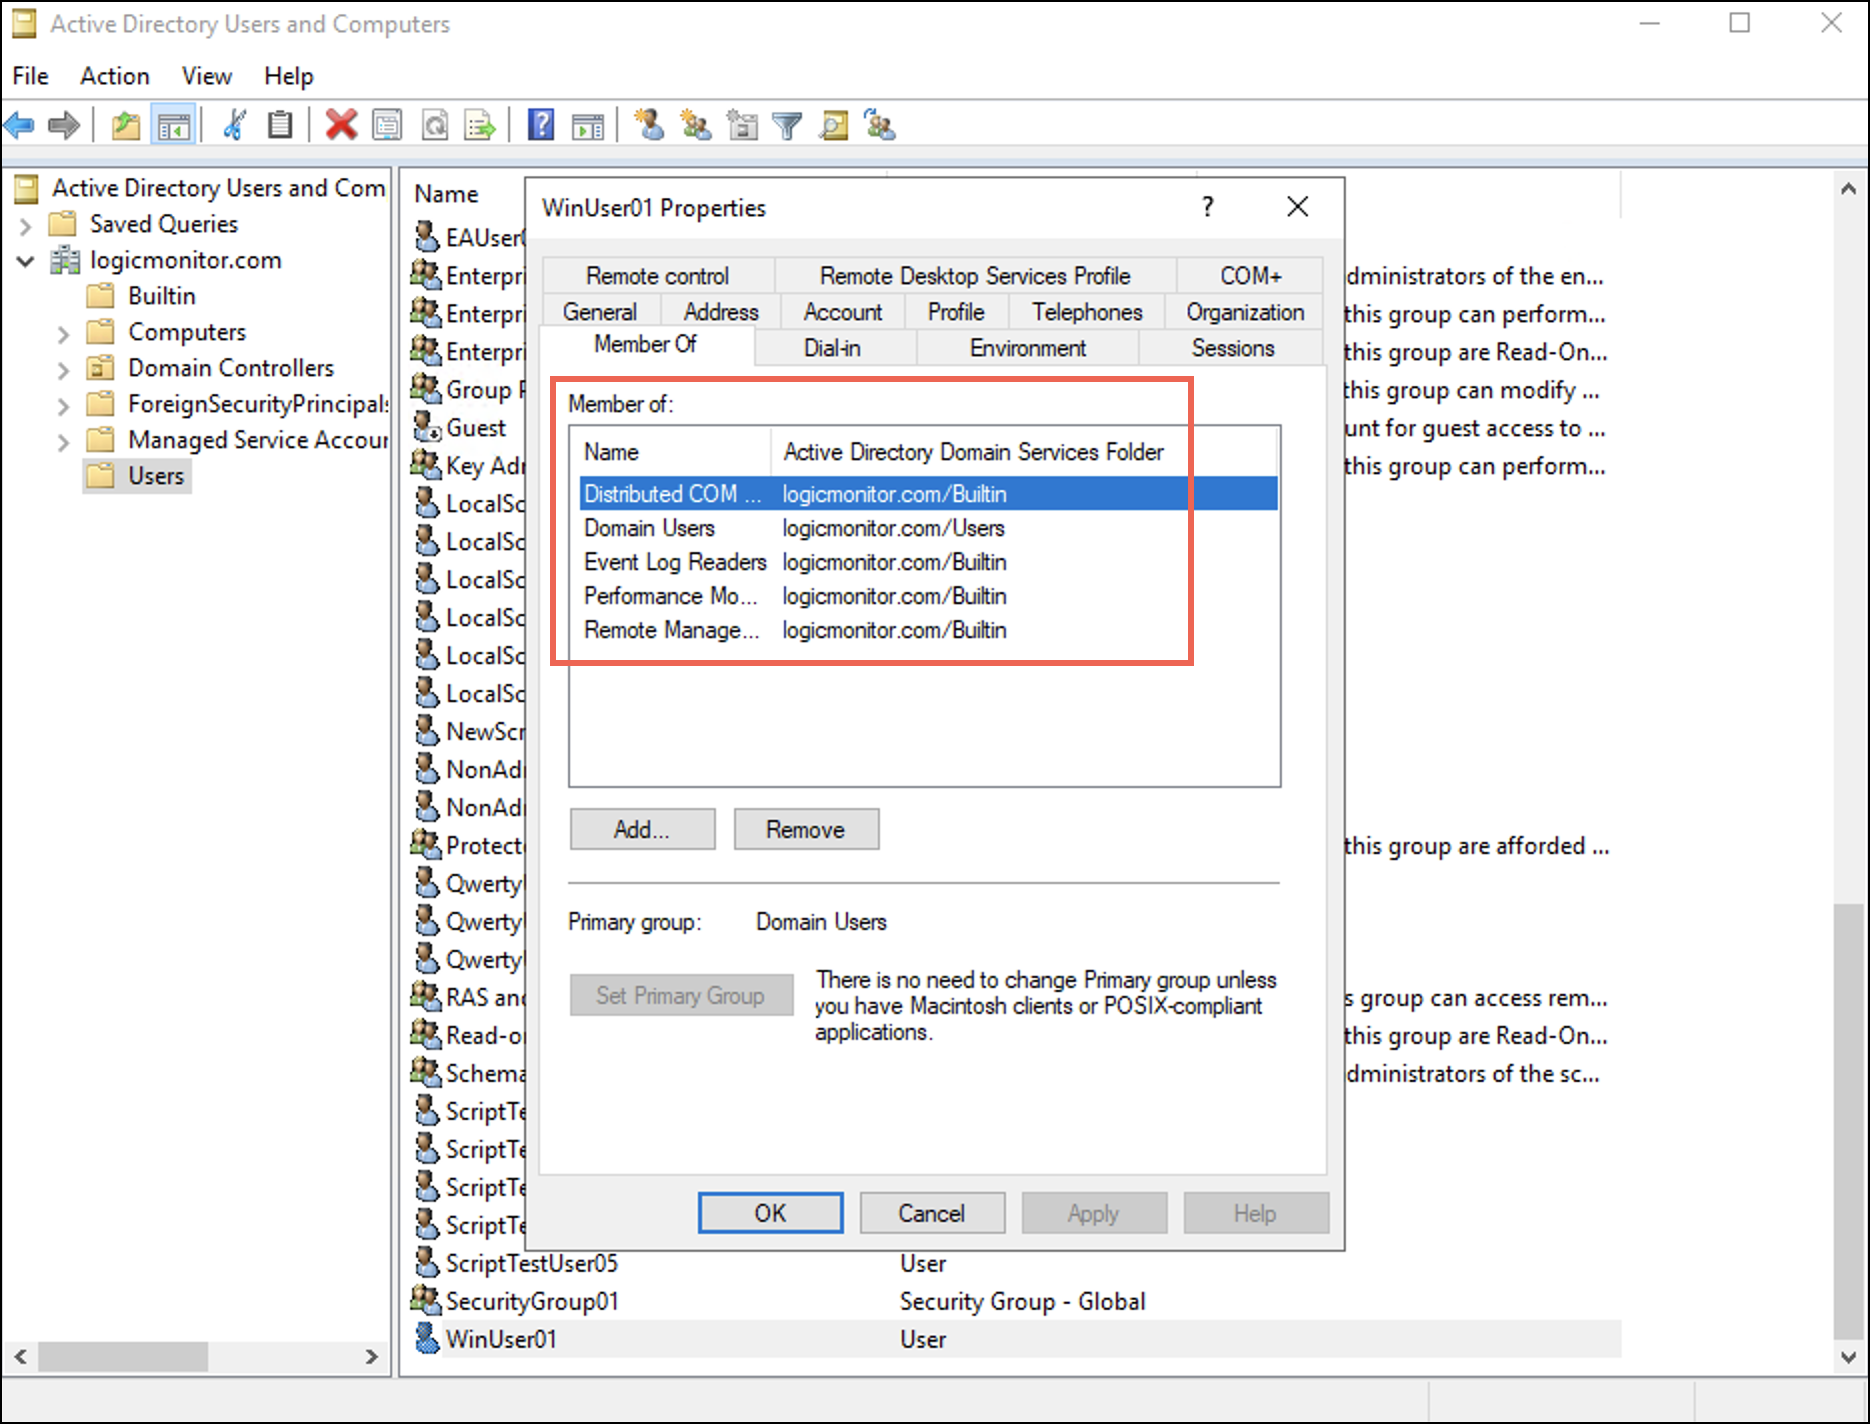
下 所属 tab you can observe that the user is added to the four groups. - 選択 申し込む 次に選択します OK.
Adding User to Groups in a Non-domain or Local Setup
- From an elevated PowerShell console or cmd.exe, type the command
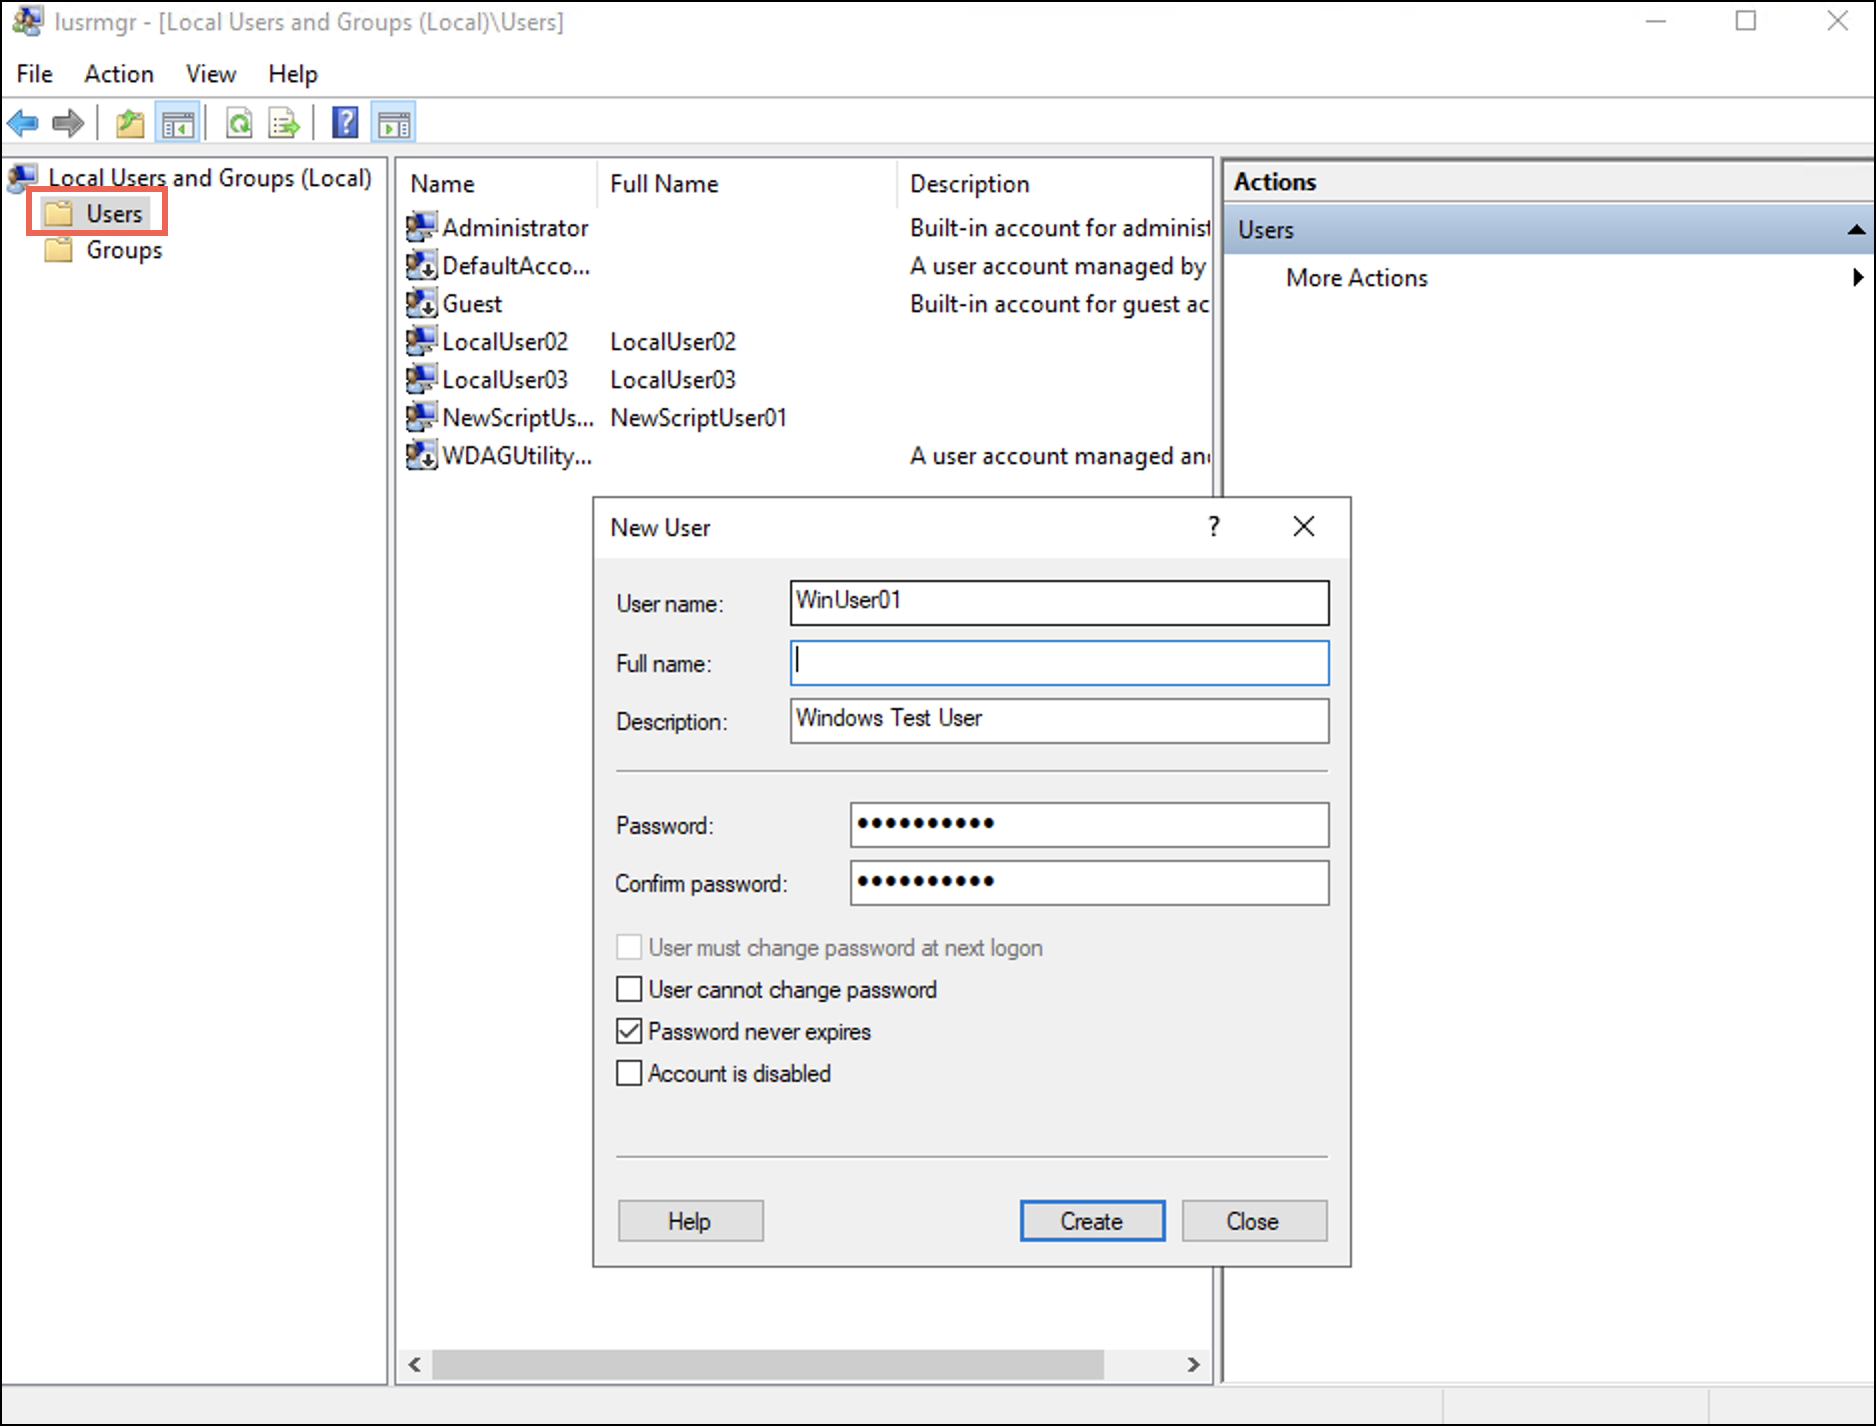
lusrmgrto launch Local Users and Groups. Alternatively, you can open lusrmgr.mscと from the Run window (Win+R). - を右クリックします。 ユーザー フォルダを選択 新規ユーザ。 A 新規ユーザ ダイアログボックスが表示されます。
- Enter a username and password for the new user and select the 創造する
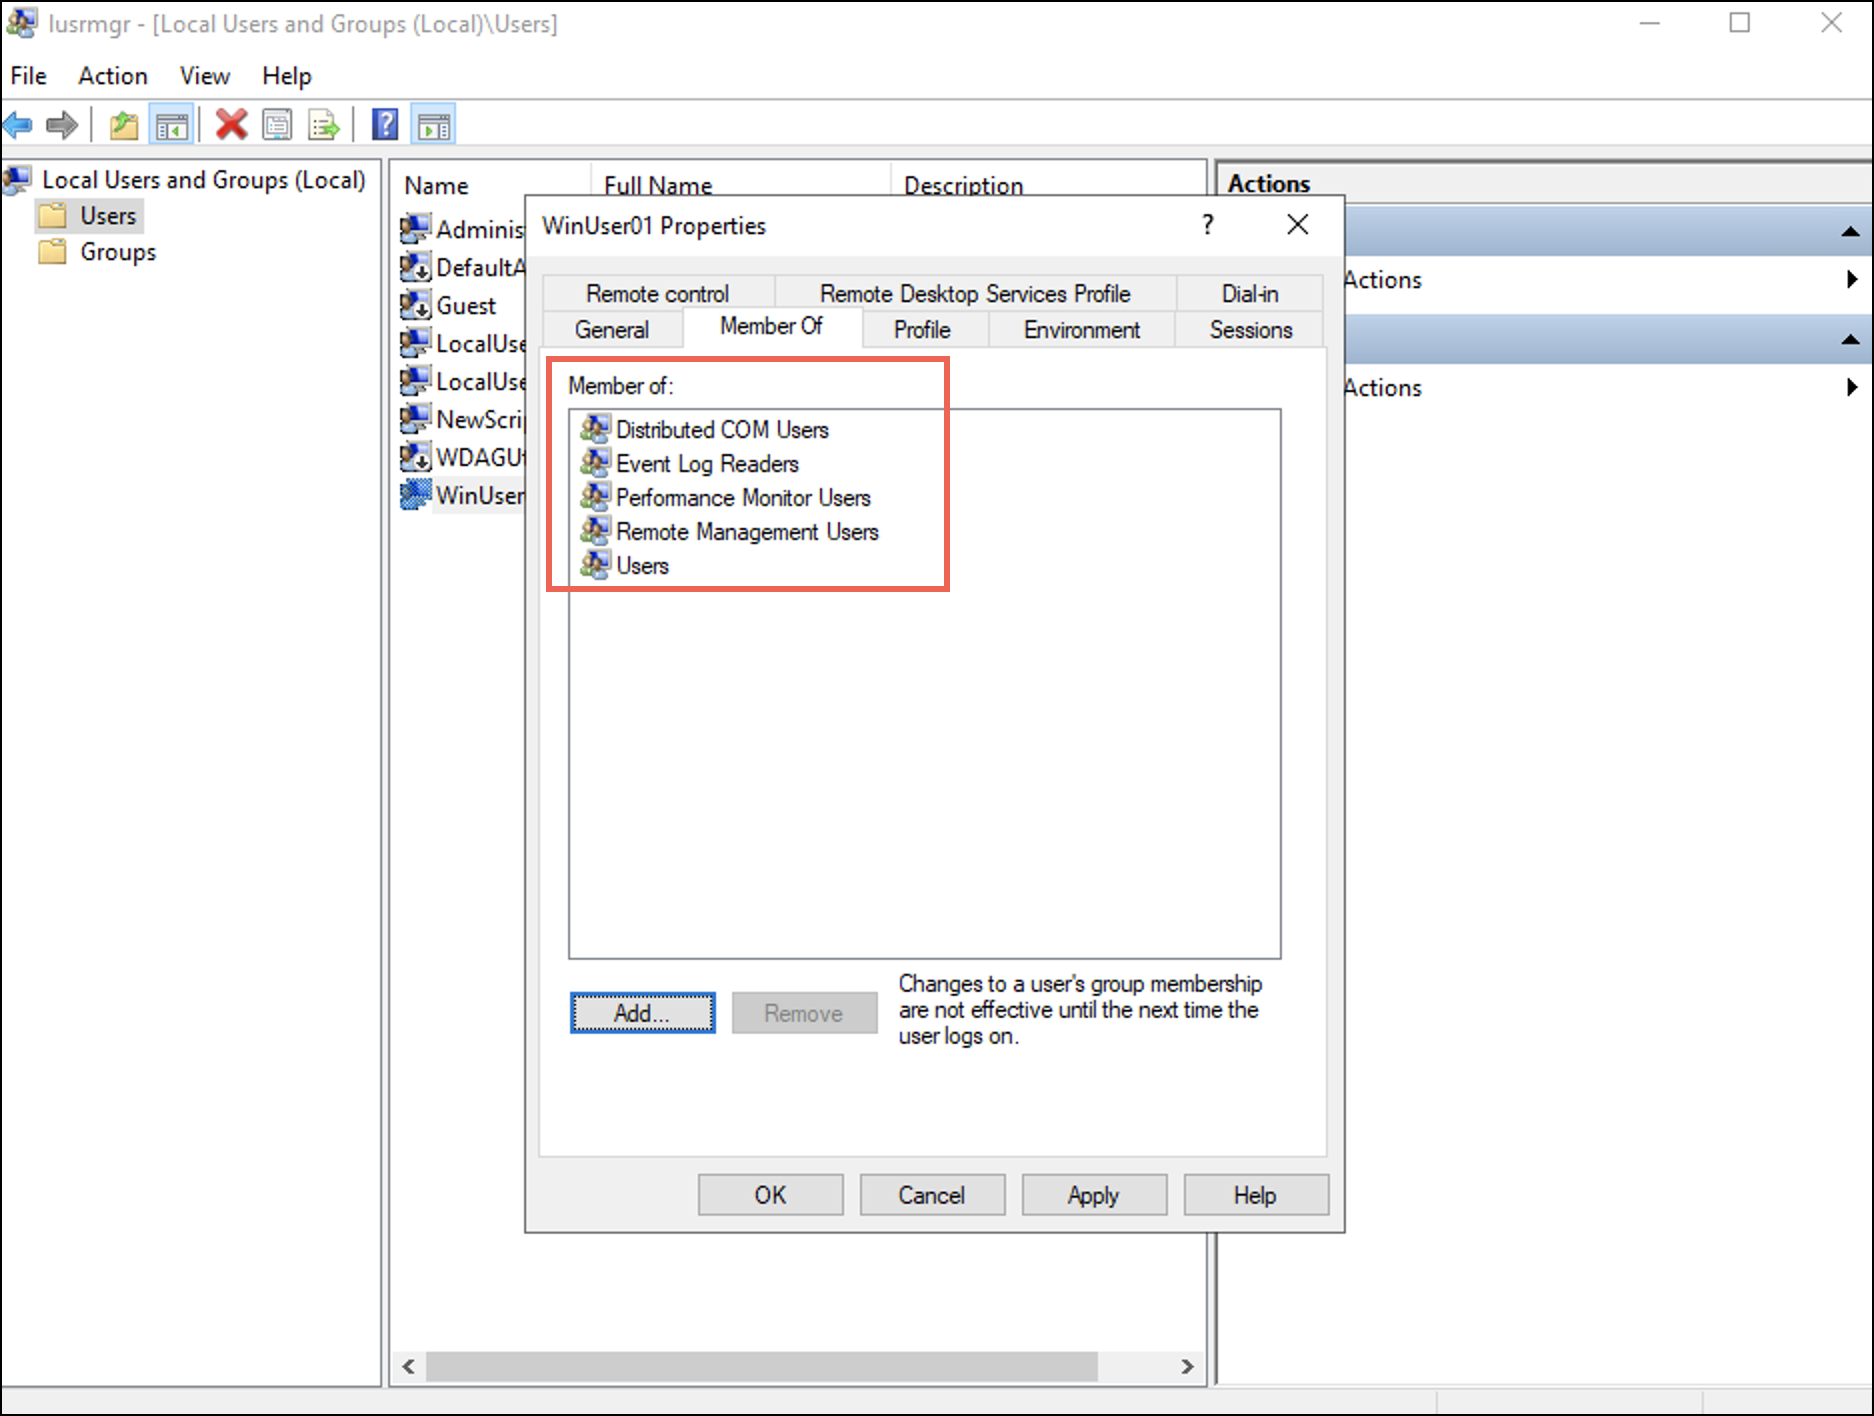
- Double-click the newly created entry of this user. The <username> Properties ダイアログボックスが表示されます。
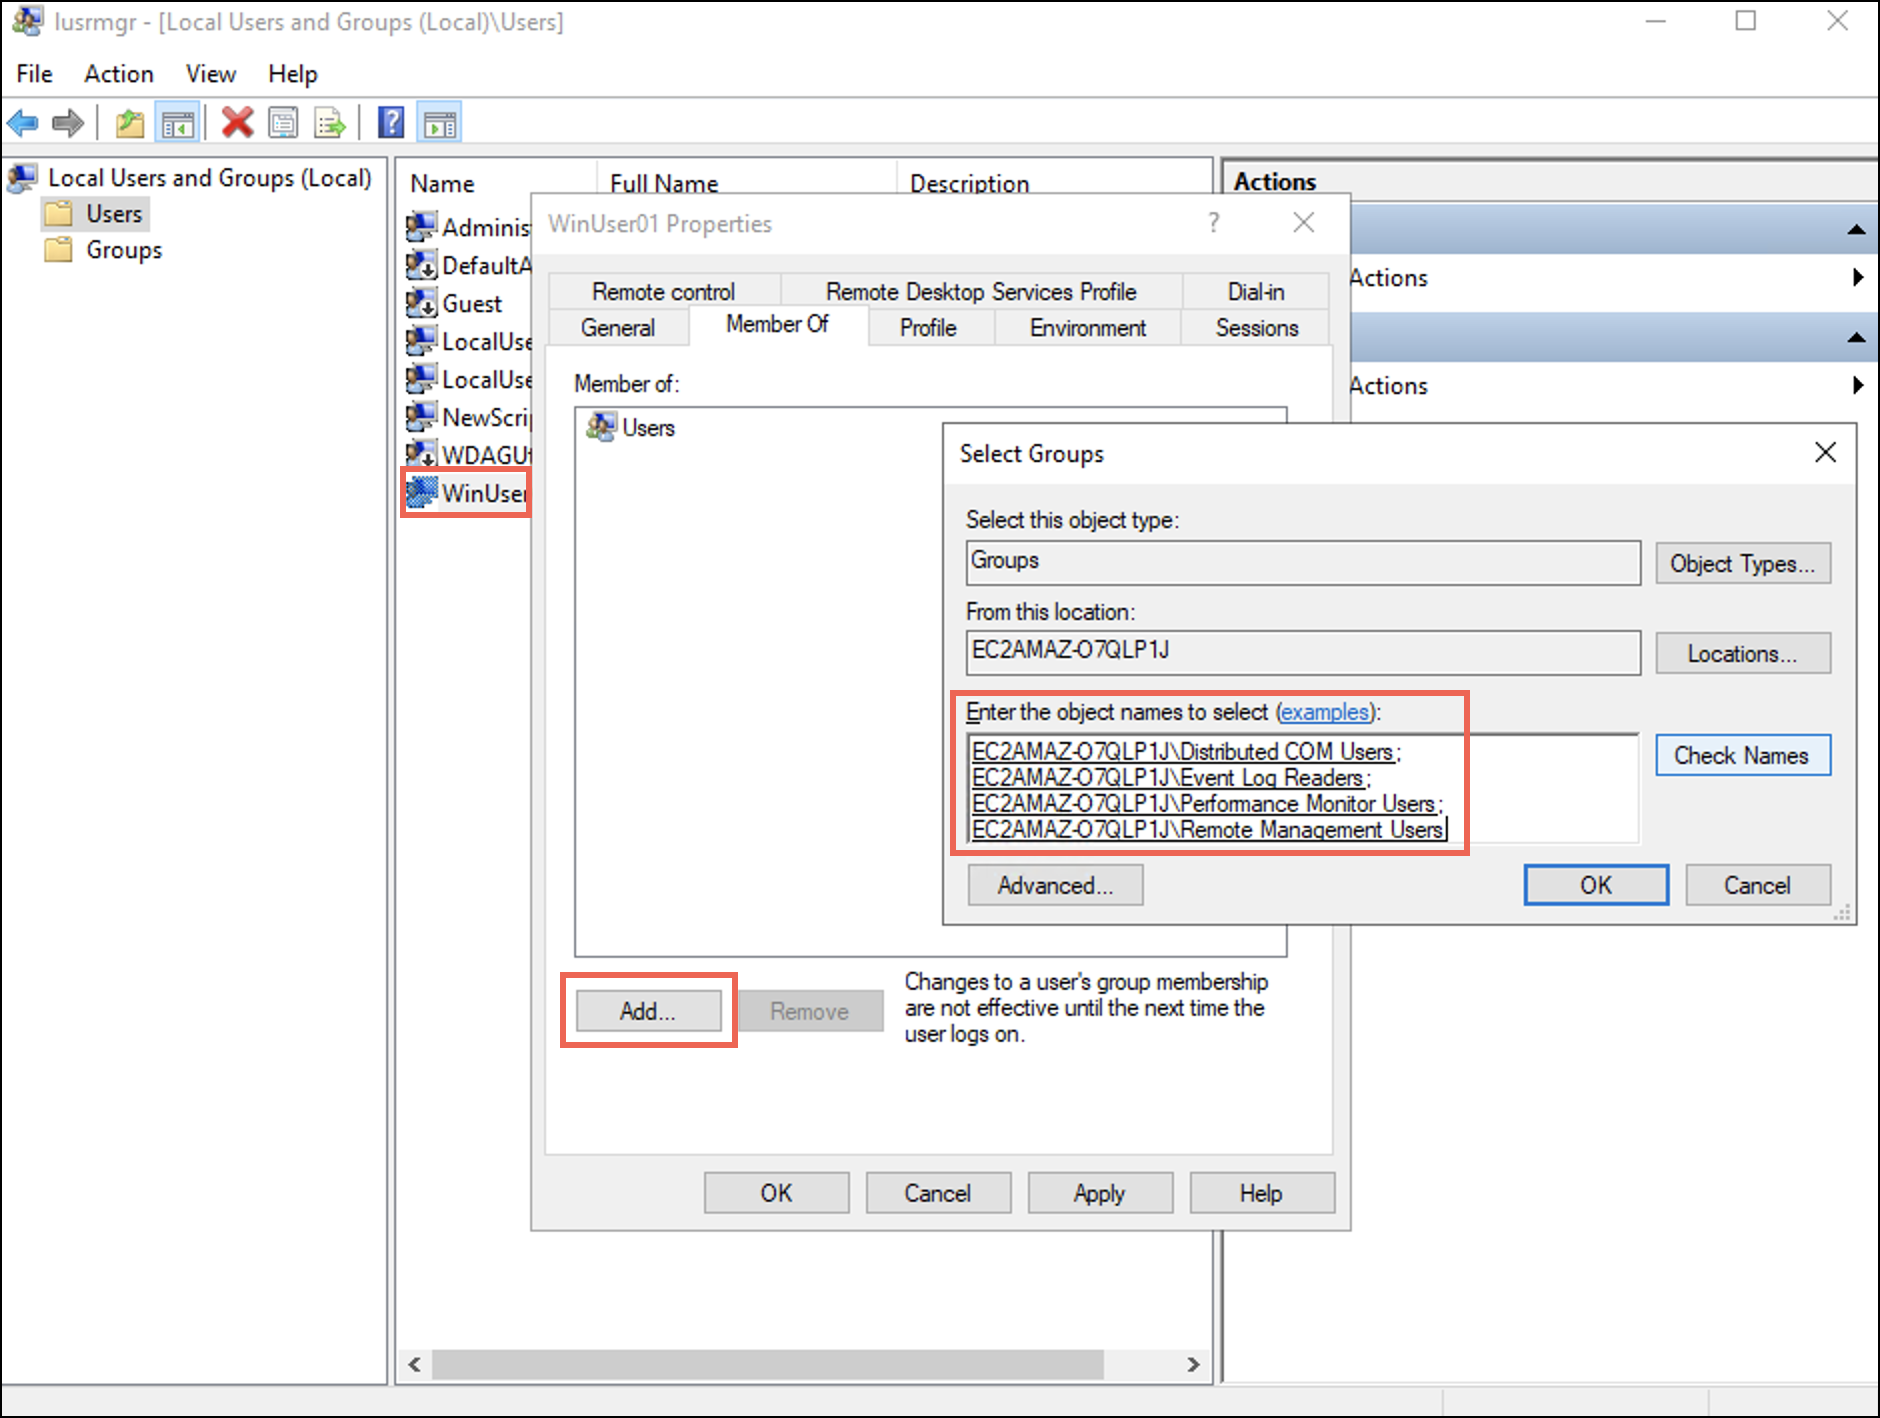
- 現在地に最も近い 所属 タブを選択して Add ボタン。 ザ グループを選択 ダイアログボックスが表示されます。
- Enter names of the four groups in the Enter the object names to select (examples): フィールドを選択し、 OK.
下 所属 tab you can observe that the user is added to the four groups. - 選択 申し込む 次に選択します OK.
Granting WMI Namespace Security Rights
- From an elevated PowerShell console or cmd.exe, issue the command
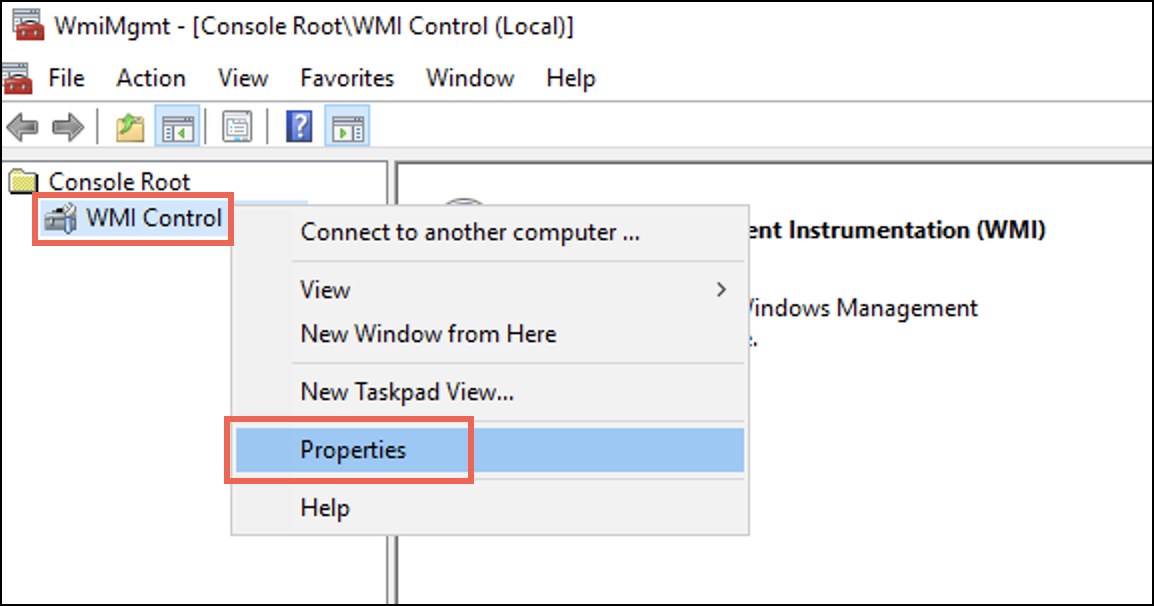
wmimgmtto launch the WMI Management Console. Alternatively, you can open wmimgmt.msc from the Run window (Win+R). - 右クリックする WMIコントロール をクリックして プロパティ.
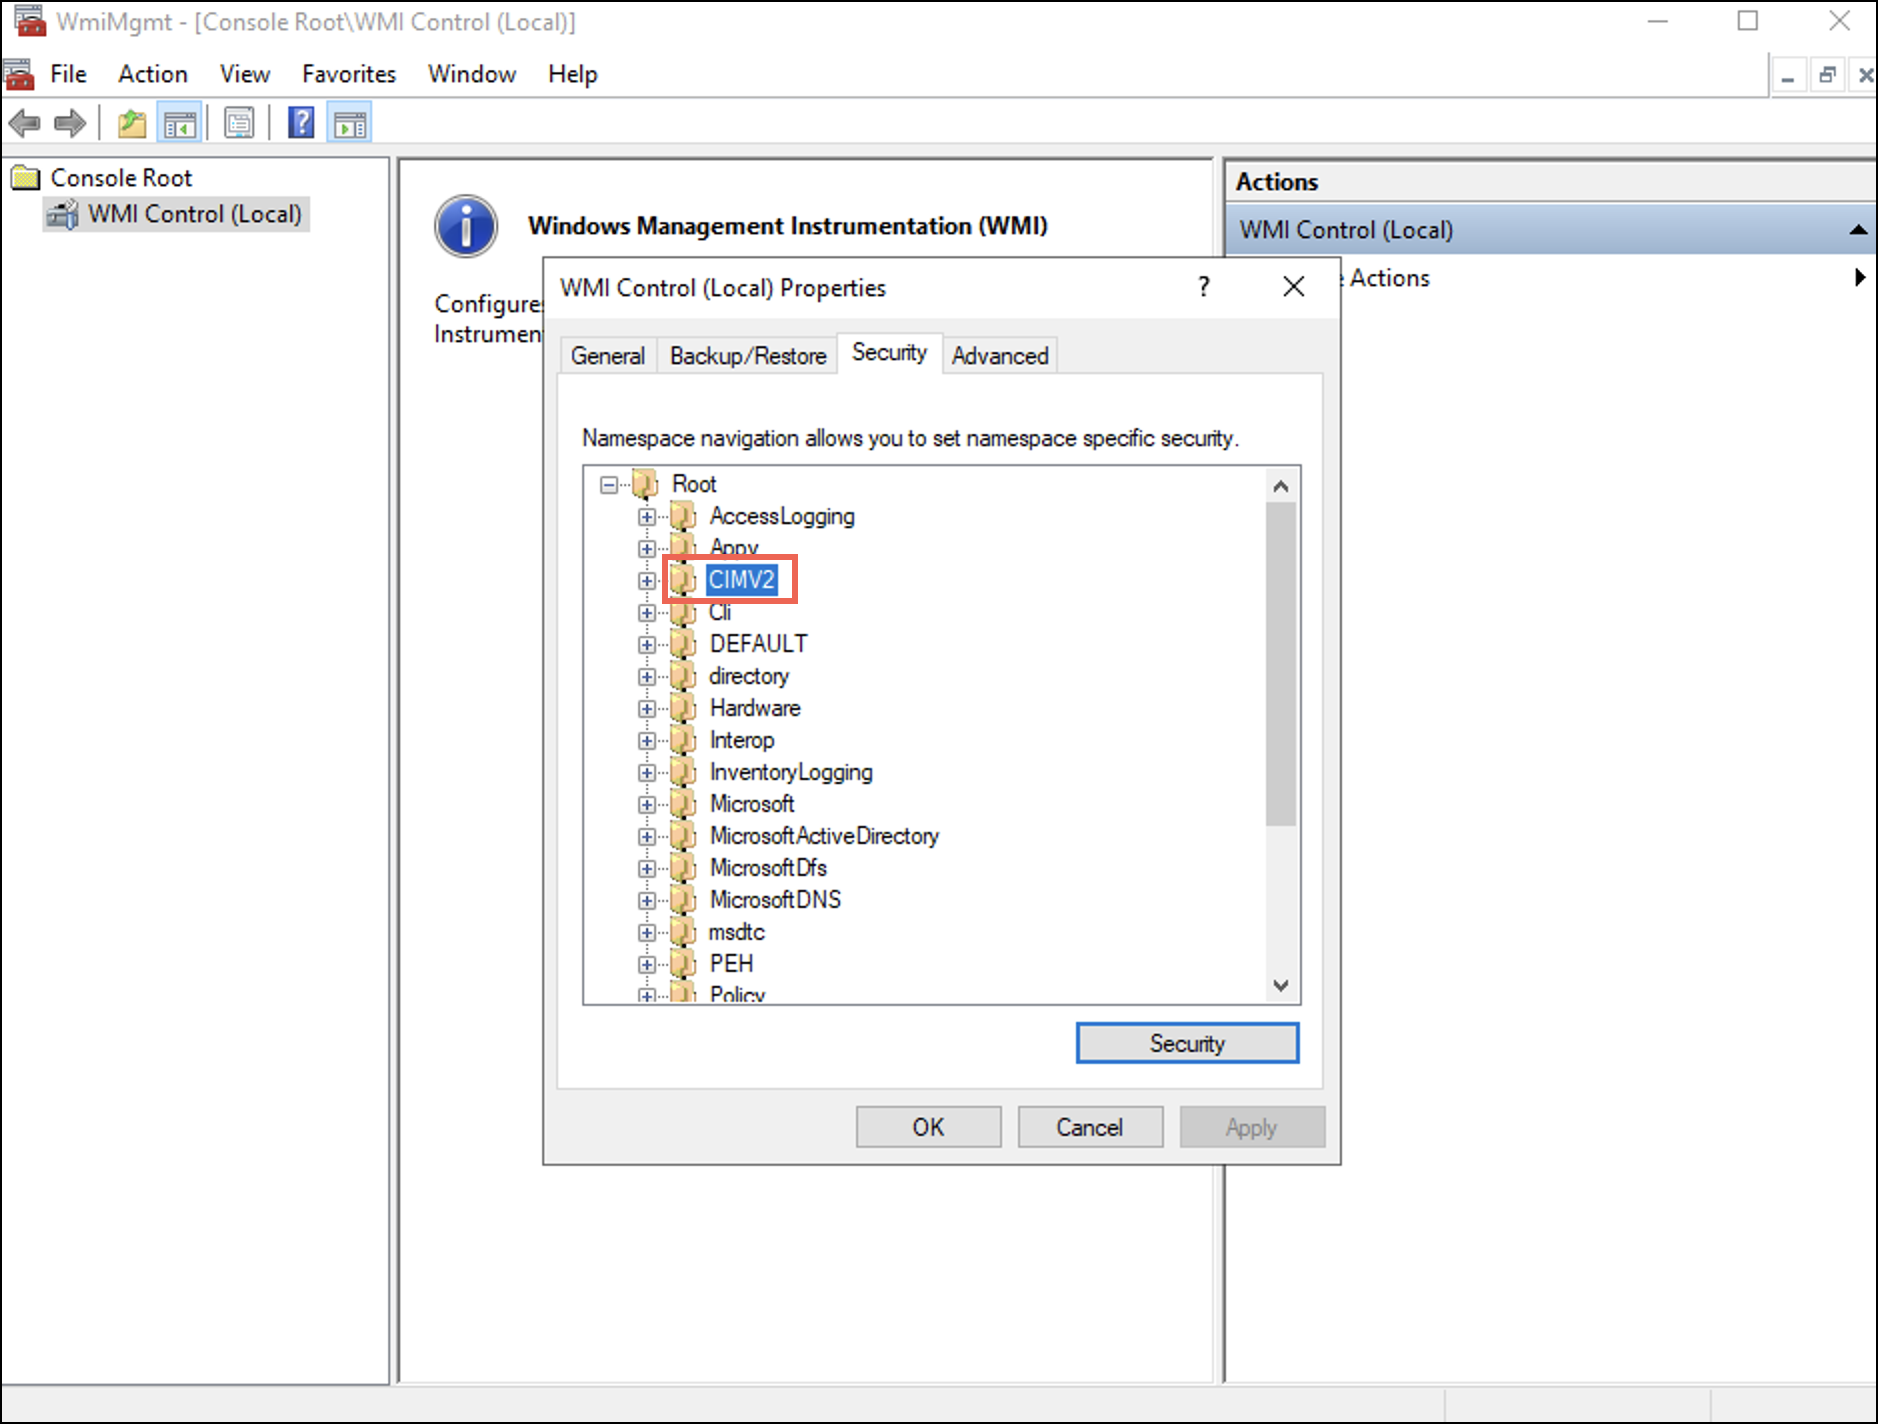
WMI Control Properties ダイアログボックスが表示されます。 - 下 セキュリティ タブで展開します ルート フォルダを選択し、 CIMV2 オプションを選択します。
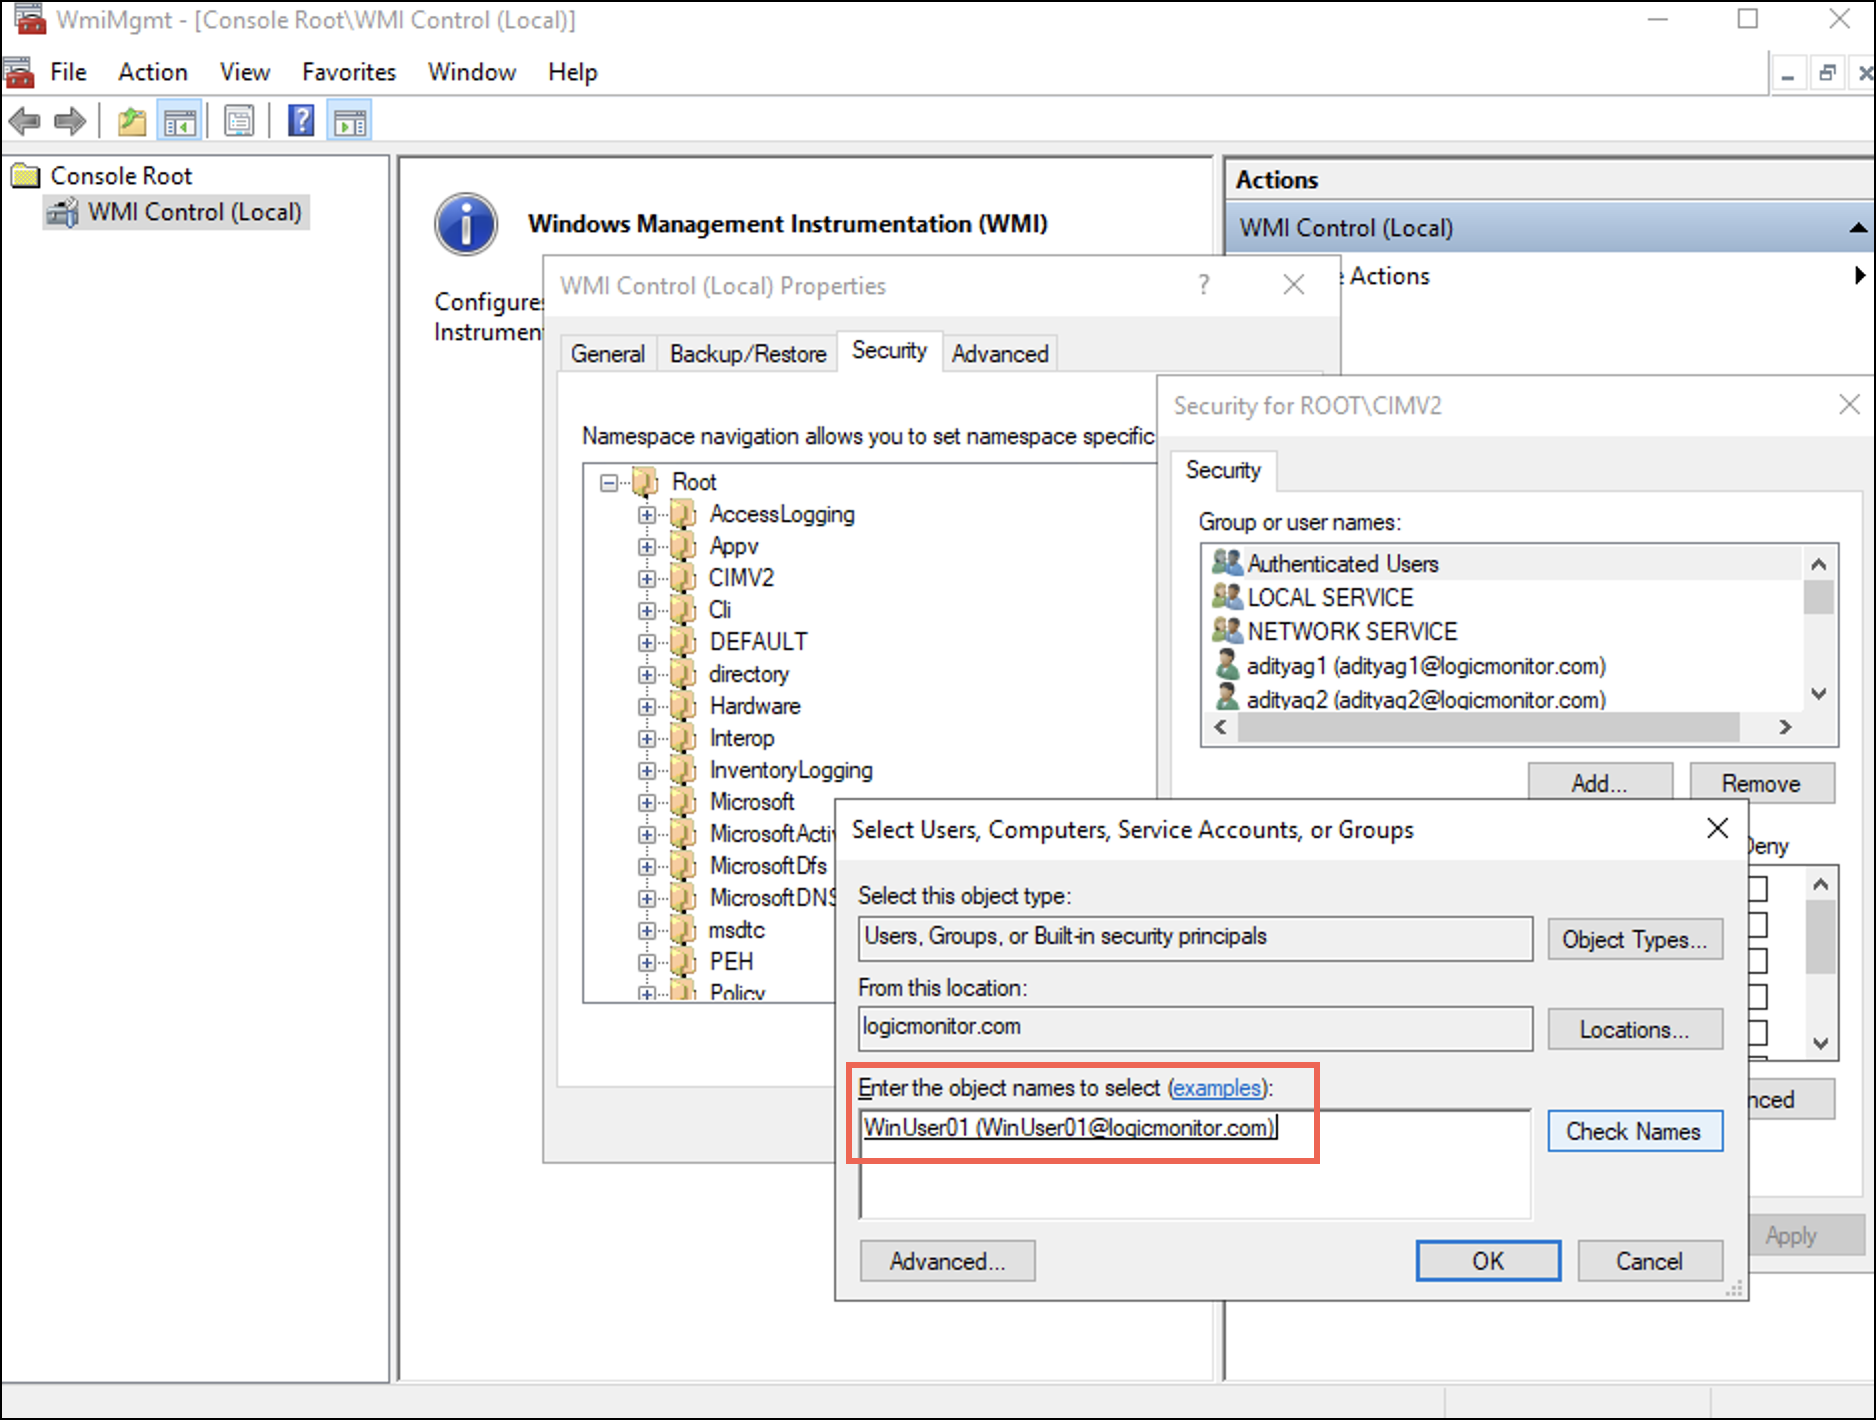
- 現在地に最も近い セキュリティ ボタン。 ザ Security for Root\CIMV2 ダイアログボックスが表示されます。
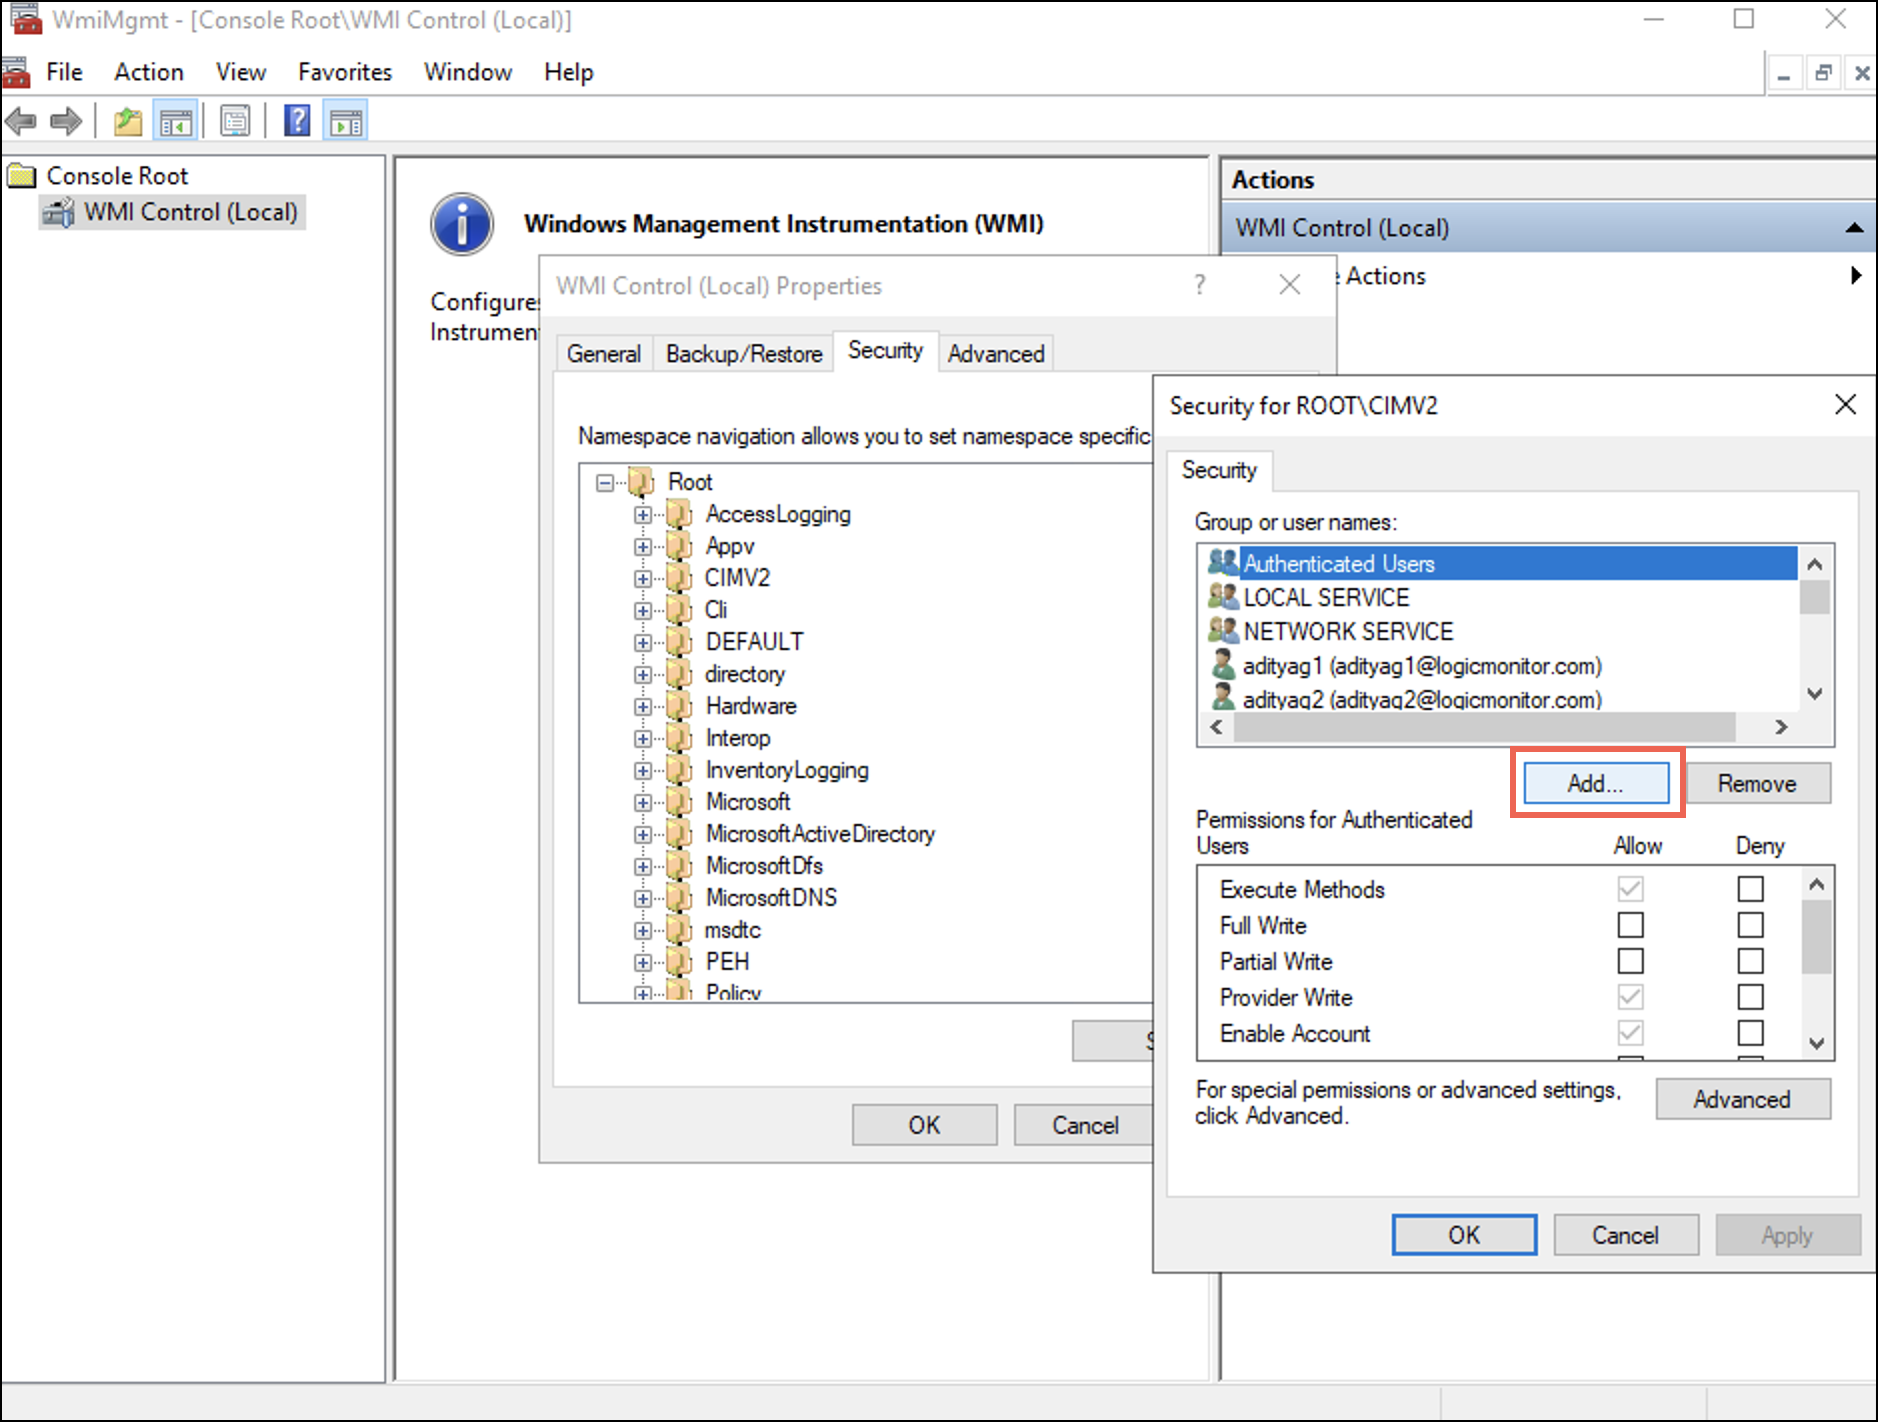
- 現在地に最も近い Add
Select Users, Computers, Service Accounts, or Groups ダイアログボックスが表示されます。 - Enter the username in the Enter the object names to select (examples): フィールドを選択し、 OK.
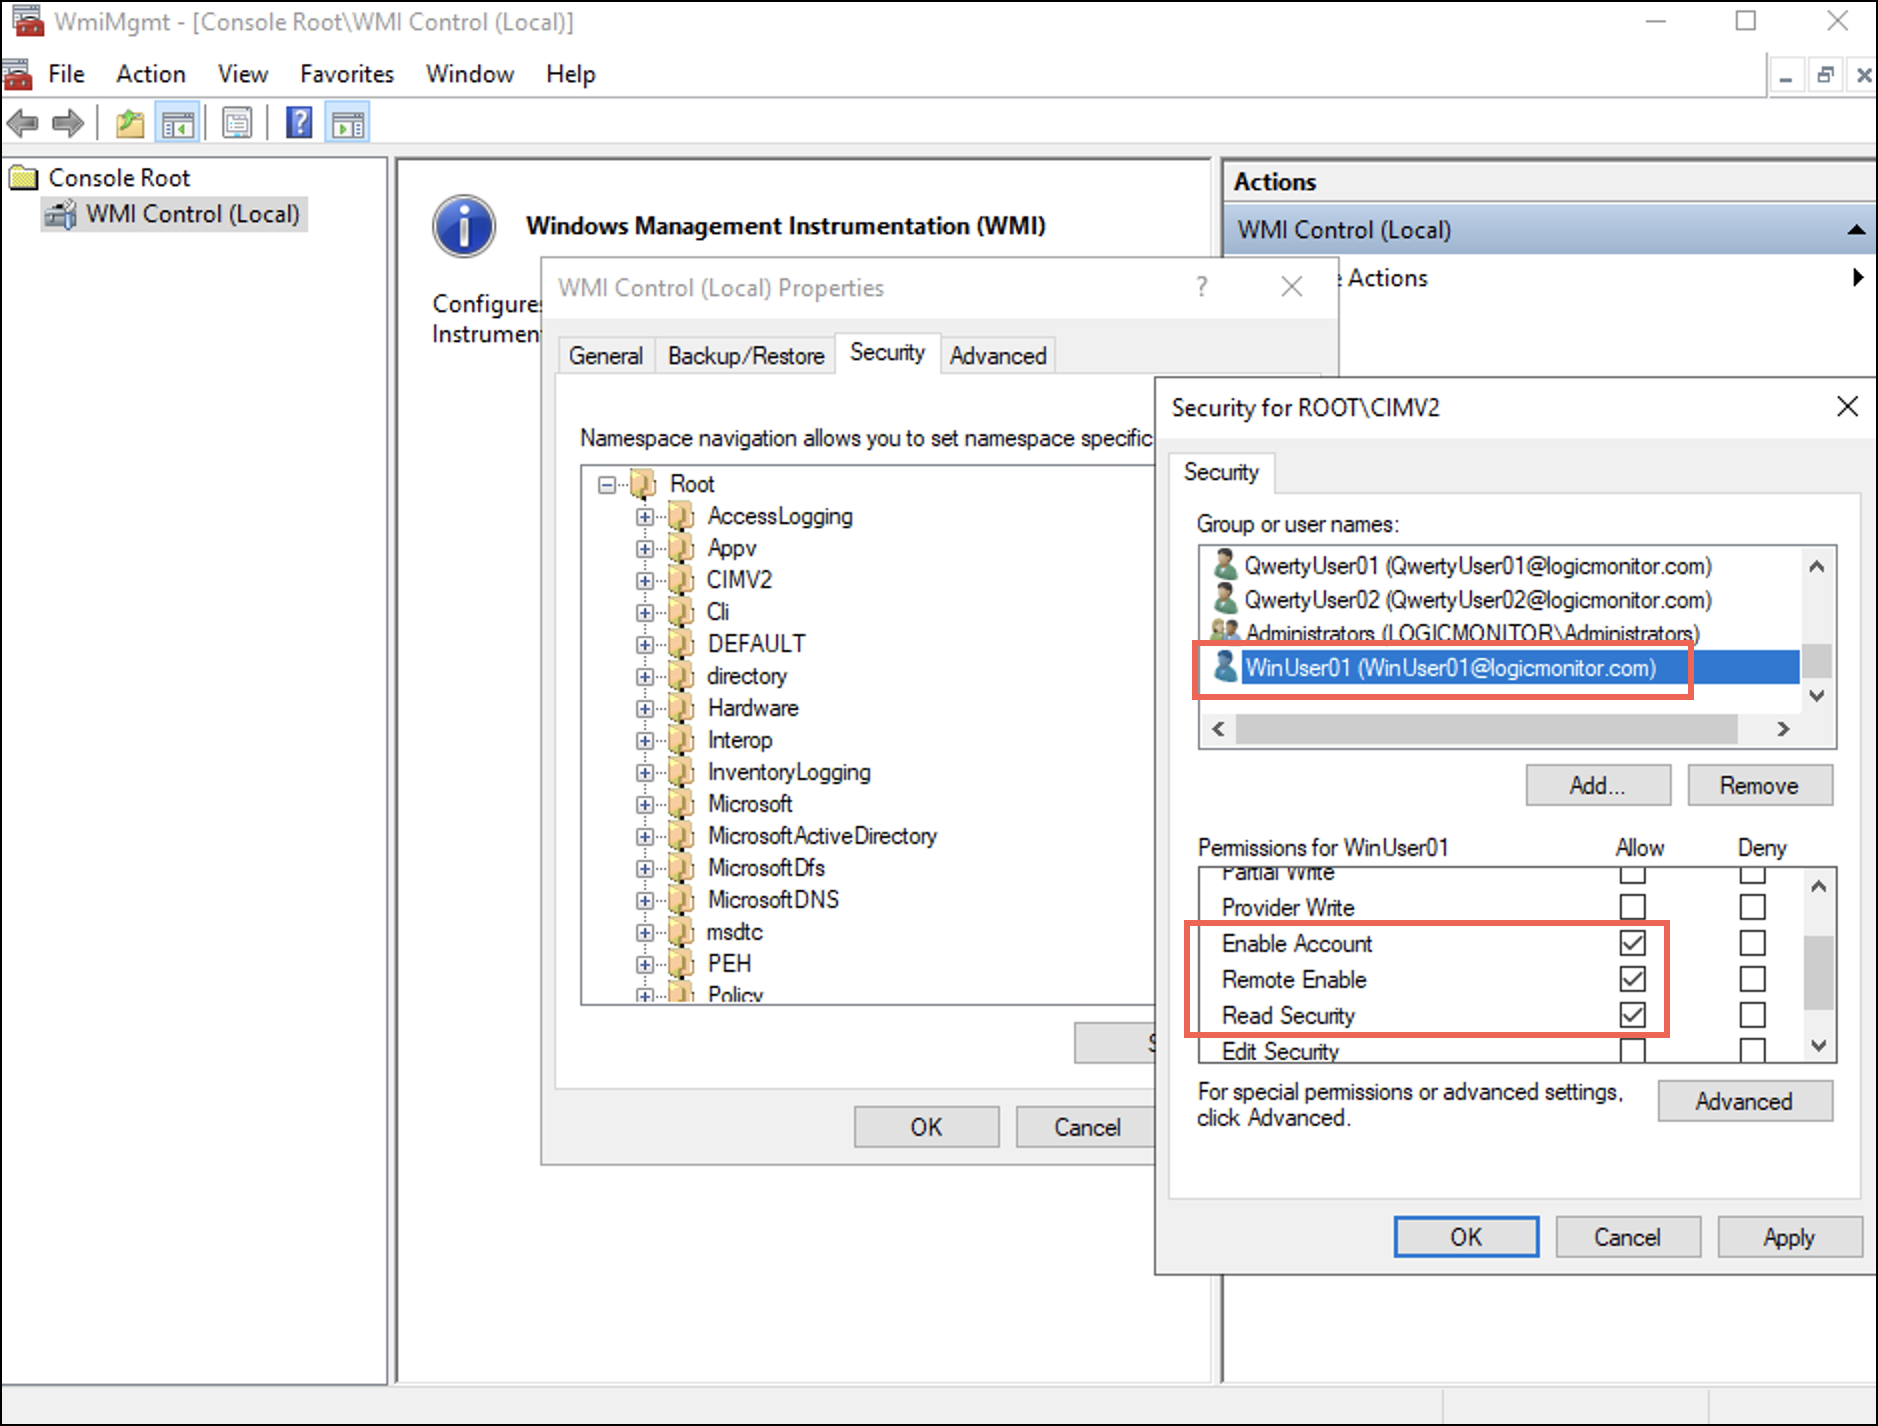
下 セキュリティ tab you can observe that the user is added to the username list. - Select the user and in the permissions for the selected user, under 次を許可します。、選択 アカウントを有効にする, リモートイネーブル, セキュリティを読む チェックボックス
- 選択 申し込む 次に選択します OK.
When we consider the principles of Least Privilege, the user gets only the following three permissions to the WMI Namespace. These permissions control access to the WMI namespaces, their associated classes, and instances.
- アカウントを有効にする–Controls the ability to enable and disable the WMI provider ensuring that only the authorised entities can control its state.
- リモートイネーブル–Governs whether remote systems can access and query the WMI provider on the local computer, thus preventing unauthorised remote access.
- セキュリティを読む–Allows accounts to view security configurations of the WMI namespace, helps to audit, and ensures efficient management of security settings.
Granting Windows Service Permissions – SDDL Changes
To change the permissions of Service Control Manager (SCManager) and the Win32_services, follow these steps:
- To retrieve the Service ID (SID) of the LogicMonitor user, run the following command in PowerShell.
[wmi] "win32_useraccount.domain='<domainName>',name='<userName>'" - To get the SDDL of the SCManager, run the following command in PowerShell.
sc.exe sdshow SCMANAGER
Sample of the retrieved SDDLD:(A;;CC;;;AU)(A;;CCLCRPRC;;;IU)(A;;CCLCRPRC;;;SU)(A;;CCLCRPWPRC;;;SY)(A;;KA;;;BA)S:(AU;FA;KA;;;WD)(AU;OIIOFA;GA;;;WD) - Create a string to append to the parent SDDL. You must replace it with the actual SID of the LogicMonitor user.
Syntax : (A;;LCRPRC;;;$UserSID)Example: (A;;LCRPRC;;;S-1-5-21-265800110-2195697097-2714329818-1112) - Append the string next to the
(A;;CCLCRPRC;;;IU)文字列。D:(A;;CC;;;AU)(A;;CCLCRPRC;;;IU)(A;;LCRPRC;;;S-1-5-21-265800110-2195697097-2714329818-1112)(A;;CCLCRPRC;;;SU)(A;;CCLCRPWPRC;;;SY)(A;;KA;;;BA)S:(AU;FA;KA;;;WD)(AU;OIIOFA;GA;;;WD) - Set the new SDDL as the security descriptor of the SCManager.
sc sdset scmanager “D:(A;;CC;;;AU)(A;;CCLCRPRC;;;IU)(A;;LCRPRC;;;S-1-5-21-265800110-2195697097-2714329818-1112)(A;;CCLCRPRC;;;SU)(A;;CCLCRPWPRC;;;SY)(A;;KA;;;BA)S:(AU;FA;KA;;;WD)(AU;OIIOFA;GA;;;WD)"
例
変更するには Win32_services to another service such as AppMgmt service, you must perform all the steps given for changing permissions of the SCManager. You must ensure to replace SCManager with the <serviceName>of the Windows service. For example, the following command displays the security descriptor of the AppMgmt サービス。
sc.exe sdshow AppMgmtYou can either create your own ACLs or copy the segment from the SDDL that ends with Interactive Users (IU) that is, (A;;CCLCRPRC;;;IU)。 ACLの作成の詳細については、を参照してください。 ACE文字列.
Automating Non-admin Configuration
Instead of manually performing the configuration steps, you can run a PowerShell script Windows_NonAdmin_Config.ps1 to automate the non-admin configuration process. This script is available from EA Collector 35.400 onwards.
注:
- The script is bundled with the Windows collector installer.
- After installing the collector, go to \LogicMonitor\Agent\bin.
- The path has the
Windows_NonAdmin_Config.ps1script. You must copy and paste the script to individual domain devices. -
Windows_NonAdmin_Config.ps1script works for both the domain and non-domain setups. - You can can check the detailed logs at
%appdata%\LogicMonitor\Logs場所。
To automate the non-admin configuration process, do the following:
- Open a PowerShell session as administrator, and change the path to the script location \LogicMonitor\Agent\bin.
- For the domain based setup, to run the script, pass the ユーザー名 parameter in the DomainName\UserName format.
.\Windows_NonAdmin_Config -add -UserName logicmonitor\DomainUser101
For the non-domain setup, use the following format.
.\Windows_NonAdmin_Config -add -UserName DomainUser101Rolling back to Administrator User
To roll back to admin configuration, follow these steps:
- Open a PowerShell session as non-admin, and go to the script location \LogicMonitor\Agent\bin.
- For the domain based setup, run the following script:
.\Windows_NonAdmin_Config -remove -UserName logicmonitor\QueryUser101For the non-domain based setup, run the following script:
.\Windows_NonAdmin_Config -remove -UserName QueryUser101
Migrating Admin to Non-admin User for Collector Service Account
The step elaborated in this support article convert the Windows user to non-admin and give it necessary rights to query data.
During collector installation if you have used Collector Service Account credentials then the collector is running under the admin user. You can convert the admin user to non-admin user using the Windows_NonAdmin_Config.ps1 script. For example, if your collector username is LogicMonitor, use the following command to convert it to non-admin. You can add the domain name if it is a domain based setup.
.\Windows_NonAdmin_Config -add -UserName LogicMonitor